
Part 1 - Softing Secure Integration Server 1.22 Login
Analysing the login flow for Softing Secure Integration Server.
Introduction
Softing Secure Integration Server (SIS) was one of the available targets for Pwn2Own Miami 2023, and also for 2022. Having just completed my OSED a few weeks prior to P2O Miami 2023, I wanted to test my new skills against a real-world target. This resulted in going down a lot of rabbit holes and chasing red herrings, but eventually led to this set of blog posts. I didn’t expect to find 0days (and did not) but like to think I gained some valuable experience by going up against a real-world application that was completely unknown to me at the time.
This is the first post in the series related to Softing SIS. In this post, we will analyse what the login flow for Softing SIS is like. As of the time of this writing, 1.22 is the latest version. You can download a trial version of Softing SIS from here.
The login flow
After downloading the trial version, we install it in a Windows virtual machine. I used Windows Server 2019 as the base operating system. The default username and password after installing Softing SIS is “admin / admin”, and the login is located at a web service running on TCP port 8099. Before submitting the credentials, open up the Developer Tools and navigate to “Network”. Once we submit the credentials, this is what we see:

The first two requests are of interest. The parameter _ can be ignored, it only contains a timestamp and removing this parameter and replaying the request does not change the response.
The GET request to /authentication-token is empty, but the response contains the “authentication token” in JSON format:

Immediately after that, the next GET request is to the /authentication endpoint, with the following parameters:
User: the usernameSignature: a signature of some sort
If the login is successful, it returns a “Success” message:

Assuming we have a username and a password, how would we login to Softing SIS programatically? The answer lies in the JavaScript file layout.js in the function p(), line 205:
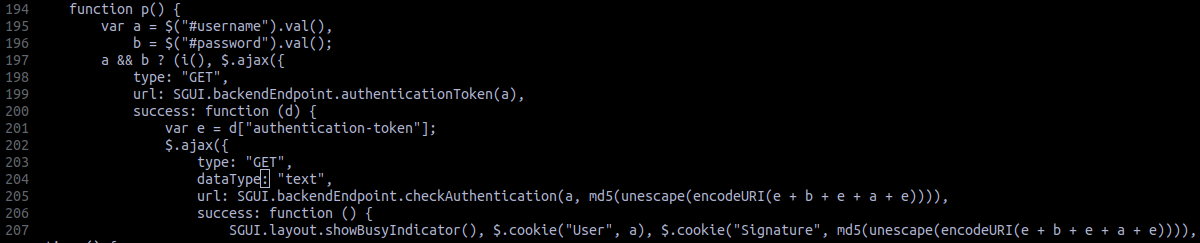
This is the JavaScript after deobfuscating it using de4js. There really is no obfuscation going on, but de4js is my choice of tool when making JavaScript pretty, so that’s what I use.
Putting it together
First things first, we get the authentication token. This is straightforward, send a GET request to the /authentication-token endpoint and get the authentication token from the response.
Next, we need to generate a valid Signature. The algorithm to generate the Signature is md5(unescape(encodeURI(e + b + e + a + e))), where:
a: the usernameb: the passworde: the authentication token
Essentially, if we concatenate like so auth_token + password + auth_token + username + auth_token and take the MD5 hash of the resulting string, we will get our Signature. The resulting signature can be used to bruteforce logins to the Softing SIS application, as there is no rate limiting in place.
A Metasploit module would be a great way to do this, so I created one: auxiliary/scanner/http/softing_sis_login.
Conclusion
While login bruteforce isn’t part of P2O, Chris Anastasio and Steven Seeley from Incite Team used ARP poisoning in the local network to obtain the Signature. This was possible because the client-side JavaScript would keep sending heartbeats to the Softing SIS application to keep the session alive:

In default configuration, all communications go through TCP port 8099, without any encryption. The signature obtained this way can then be used in future attacks.
In part 2, we will attempt to recreate the exploit chain (without the ARP spoofing) used by Incite Team (CVE-2022-1373 and CVE-2022-2334) to obtain RCE against Softing SIS.